From Scratch to Perfection: Mastering the Art of Homemade Lemon Bars with a Buttery Shortbread Crust
Making homemade lemon bars is a delightful and rewarding experience. There’s something special about baking from scratch and creating a delicious treat with your own hands. The process of making lemon bars allows you to unleash your inner baker and enjoy the journey from start to finish. From mixing the ingredients to watching the bars bake to perfection, every step is filled with joy and satisfaction.
The Delightful Journey of Making Homemade Lemon Bars
The journey of making homemade lemon bars is a delightful one. It begins with gathering all the necessary ingredients and preparing the kitchen for baking. As you mix together the buttery shortbread crust, the aroma fills the air, creating a sense of anticipation for the final result. Once the crust is baked to a golden perfection, it’s time to prepare the tangy lemon filling. The process of zesting and juicing fresh lemons adds a burst of freshness to the kitchen.
As you pour the lemon filling over the crust and watch it set in the oven, you can’t help but feel a sense of accomplishment. The waiting game begins as you eagerly wait for the bars to cool and set completely. Finally, it’s time to cut them into squares and take that first bite. The combination of the buttery crust and tangy lemon filling is pure bliss. The journey of making homemade lemon bars is not only about the end result, but also about enjoying every step along the way.
A Step-by-Step Guide to Creating the Perfect Lemon Bars
To create the perfect lemon bars, follow this step-by-step guide:
1. Preheat your oven to 350°F (175°C) and line a baking dish with parchment paper.
2. In a mixing bowl, combine 1 cup of all-purpose flour, 1/4 cup of powdered sugar, and a pinch of salt.
3. Cut in 1/2 cup of cold butter until the mixture resembles coarse crumbs.
4. Press the mixture into the bottom of the prepared baking dish and bake for 15-20 minutes, or until lightly golden.
5. While the crust is baking, prepare the lemon filling by whisking together 1 cup of granulated sugar, 2 tablespoons of all-purpose flour, 1/4 teaspoon of salt, 2 beaten eggs, the zest of 2 lemons, and 1/3 cup of freshly squeezed lemon juice.
6. Pour the lemon filling over the baked crust and return to the oven for an additional 20-25 minutes, or until set.
7. Allow the bars to cool completely before cutting into squares and serving.
Tips and tricks:
– For a more intense lemon flavor, add an extra tablespoon of lemon zest to the filling.
– To prevent a soggy crust, prick the bottom of the crust with a fork before baking.
– If you prefer a thicker crust, double the crust ingredients and increase the baking time accordingly.
Unleashing Your Inner Baker: Mastering the Art of Lemon Bars
Making lemon bars is not just about following a recipe; it’s about embracing your inner baker and enjoying the process. By mastering the art of lemon bars, you gain confidence in your baking skills and open up a world of possibilities. Once you have perfected this classic dessert, you can experiment with different variations and flavors to create your own signature lemon bars.
The benefits of mastering lemon bars go beyond just satisfying your sweet tooth. It allows you to connect with your creativity and express yourself through baking. The joy that comes from sharing your homemade lemon bars with friends and family is immeasurable. So don’t be afraid to unleash your inner baker and embark on this delicious journey.
Elevating Your Baking Skills: Perfecting the Buttery Shortbread Crust
The crust is an essential component of lemon bars, as it provides a buttery and flaky base for the tangy lemon filling. To achieve the perfect crust, there are a few tips to keep in mind. First, make sure your butter is cold and cut it into small pieces before incorporating it into the flour mixture. This will help create a flaky texture.
When mixing the crust ingredients, be careful not to overmix. The goal is to have the butter evenly distributed throughout the flour mixture, but you don’t want to overwork the dough. Overmixing can result in a tough crust.
Another tip for achieving a buttery shortbread crust is to use powdered sugar instead of granulated sugar. Powdered sugar contains cornstarch, which helps create a tender and crumbly texture. Additionally, using powdered sugar adds a touch of sweetness to the crust without overpowering the tanginess of the lemon filling.
The Secret to Mouthwatering Lemon Bars: Choosing the Right Lemons
The secret to mouthwatering lemon bars lies in choosing the right lemons. Fresh and flavorful lemons are essential for achieving that perfect balance of sweet and tangy. When selecting lemons for your lemon bars, look for ones that are firm and heavy for their size. Avoid lemons that have soft spots or are overly wrinkled, as they may be past their prime.
To get the most juice out of your lemons, roll them on a hard surface before cutting them in half and juicing them. This helps break down the membranes inside the lemon and release more juice. If you’re having trouble juicing your lemons, try microwaving them for 10-15 seconds before cutting them open. The heat will help loosen up the juice.
For an extra burst of flavor, consider using Meyer lemons instead of regular lemons. Meyer lemons are sweeter and less acidic than regular lemons, which can add a unique twist to your lemon bars. However, keep in mind that Meyer lemons are smaller, so you may need to use more of them to achieve the desired level of tanginess.
Adding a Burst of Flavor: Experimenting with Different Lemon Bar Variations
While classic lemon bars are delicious on their own, there’s no harm in getting creative and experimenting with different variations. Adding different flavors and textures to the classic recipe can take your lemon bars to a whole new level.
One simple way to add a burst of flavor is to incorporate different herbs into the lemon filling. For example, you can add a tablespoon of finely chopped fresh thyme or rosemary to the filling before baking. The herbs will infuse the lemon bars with a subtle and aromatic flavor.
If you’re a fan of citrus flavors, consider adding a layer of orange or grapefruit marmalade between the crust and the lemon filling. This will add an extra dimension of tanginess and sweetness to your bars.
For those who love a little crunch, try sprinkling some toasted coconut or chopped nuts on top of the lemon filling before baking. The added texture will provide a delightful contrast to the smooth and creamy filling.
Tips and Tricks for Achieving the Perfect Balance of Sweet and Tangy
Achieving the perfect balance of sweet and tangy in lemon bars is crucial for a delicious end result. Here are some tips and tricks to help you achieve that balance:
– Taste your lemon filling before pouring it over the crust. If it’s too sweet, add a little more lemon juice to increase the tanginess. If it’s too tart, add a tablespoon or two of powdered sugar to sweeten it up.
– Adjust the amount of sugar in the crust according to your preference. If you like a sweeter crust, increase the amount of powdered sugar by a tablespoon or two.
– To enhance the tanginess of your lemon bars, sprinkle a little extra lemon zest on top of the bars before serving. The zest will add a burst of flavor and freshness.
Remember, achieving the perfect balance of sweet and tangy is a matter of personal preference. Don’t be afraid to experiment and adjust the recipe to suit your taste buds.
From Oven to Table: Serving and Presenting Your Homemade Lemon Bars
Once your homemade lemon bars are ready, it’s time to serve and present them in an appealing way. Here are some tips for serving and presenting your lemon bars:
– Allow the bars to cool completely before cutting them into squares. This will ensure clean and neat cuts.
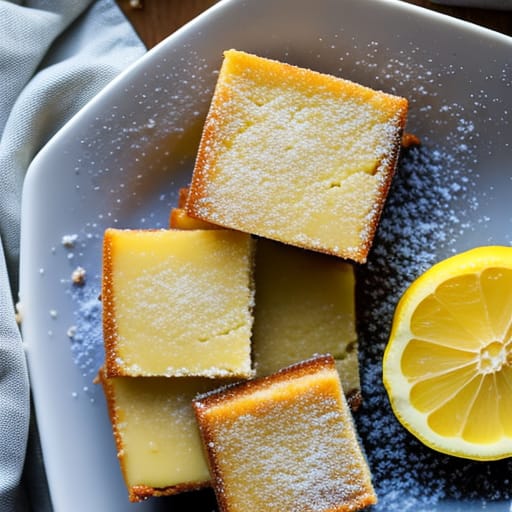
– Dust the bars with powdered sugar just before serving. This adds a touch of elegance and enhances the visual appeal.
– Serve the bars on a decorative platter or cake stand to elevate the presentation.
– Garnish each bar with a small sprig of fresh mint or a twist of lemon zest for an extra pop of color.
– For an elegant touch, serve the bars with a dollop of whipped cream or a scoop of vanilla ice cream on the side.
Remember, presentation is key when it comes to desserts. Taking the time to present your lemon bars in an appealing way will make them even more enticing.
Mastering the Art of Lemon Bars: Troubleshooting Common Baking Issues
While making lemon bars is generally a straightforward process, there are some common baking issues that may arise. Here are some solutions and tips for troubleshooting these issues:
– Soggy crust: If your crust turns out soggy, it may be due to underbaking or too much moisture in the filling. To prevent this, make sure to bake the crust until it’s lightly golden and allow it to cool completely before pouring the filling over it. You can also prick the bottom of the crust with a fork before baking to release any trapped air and prevent sogginess.
– Cracked filling: If your lemon filling cracks during baking, it may be due to overbaking or too much air incorporated into the filling. To prevent this, make sure to bake the bars until the filling is set but still slightly jiggly in the center. Avoid overmixing the filling to minimize the amount of air incorporated.
– Uneven browning: If your lemon bars have uneven browning, it may be due to hot spots in your oven or an unevenly distributed crust. To prevent this, rotate the baking dish halfway through baking to ensure even browning. You can also press the crust mixture firmly and evenly into the baking dish to ensure an even thickness.
Remember, baking is a learning process, and even experienced bakers encounter issues from time to time. Don’t be discouraged if something doesn’t turn out perfectly on your first try. With practice and patience, you’ll master the art of making lemon bars.
Taking Lemon Bars to the Next Level: Creative Garnishes and Pairings
To take your lemon bars to the next level, consider adding creative garnishes and pairings. Here are some ideas to inspire you:
– Drizzle melted white or dark chocolate over the bars for an indulgent touch.
– Top each bar with a dollop of lemon curd for an extra burst of tanginess.
– Serve the bars with a side of fresh berries or a berry compote for a fruity twist.
– Sprinkle crushed pistachios or almonds on top of the bars for added crunch and flavor.
– Pair the bars with a scoop of raspberry sorbet or lemon gelato for a refreshing dessert combination.
The possibilities are endless when it comes to garnishing and pairing lemon bars. Don’t be afraid to get creative and have fun with your creations.
Conclusion
Making homemade lemon bars is a delightful journey that allows you to unleash your inner baker and create a delicious treat from scratch. From perfecting the buttery shortbread crust to choosing the right lemons for a burst of flavor, every step is important in creating the perfect lemon bars. By mastering this classic dessert, you not only satisfy your sweet tooth but also gain confidence in your baking skills.
So why not embrace your inner baker and try making homemade lemon bars? Follow the step-by-step guide, experiment with different variations, and don’t be afraid to get creative with garnishes and pairings. The joy and satisfaction that come from creating a delicious dessert with your own hands are truly unparalleled. So gather your ingredients, preheat your oven, and embark on the delightful journey of making homemade lemon bars.